Thursday, December 25, 2008

Managing Exchange Certificates

Introduction

Certificates can be used to encrypt the communication flow between two endpoints (both clients and servers). Certificates can also be used by these endpoints to authenticate themselves from each other. Exchange 2007 uses X.509 certificates for authentication and for encryption. X.509 certificates follow a standard format as published by the Telecommunication Standardization Sector (ITU-T).

An X.509 certificate is issued by a Certificate Authority (CA) that will bind the public key to a designated Distinguished Name, formatted according to the X.500 tradition, or to a so-called Subject Alternative Name or any of the Subject Alternative Names.
There are several components in Exchange 2007 that rely on certificates for encryption, authentication or both. In this article I will provide you with an overview of the different Exchange components that use certificates. I will then go deeper into the features of the by-default generated self-signed certificate. In part 2 of this article I will cover the naming requirements of a certificate you need to keep in mind when getting your certificates. To end, in part 3 of this article I will take a closer look at the different Exchange Management Shell cmdlets that are available to create, manage, and remove Exchange certificates.

Certificate Usage by Exchange Server 2007 Components

As already stated, several Exchange Server 2007 components rely on X.509 certificates for encryption, authentication or both. You will notice that when you install the Exchange 2007 Hub Transport server role, Client Access server role, Unified Messaging server role, and Edge Transport server role, Exchange will create by default a self-signed certificate to make sure its required components can use that certificate to function as required.

Figure 1 below shows you the self-signed certificate that is created by Exchange during the installation of the Exchange 2007 Client Access, Hub, and Unified Messaging server role. This certificate will be used by the following services: IIS, SMTP, POP, IMAP, and UM.

Figure 1: Self Signed Certificate created by default when installing the Exchange 2007 HUB, CAS, UM server role

Hub/Edge Transport server role and certificates

Transport Layer Security between Active Directory sites

The Exchange 2007 Hub Transport server role uses a certificate to encrypt all SMTP traffic between Active Directory sites. It is not possible to configure Exchange to allow unencrypted SMTP traffic between Hub Transport servers, located in different sites.

In order to see which certificate is used between two Hub Transport servers located in different Active Directory sites, you can enable SMTP protocol logging on the intra-organization Send connector on every Hub Transport server, as you can see in figure 2 below, by using the Exchange Management Shell cmdlet Set-TransportServer.
Figure 2: Setting IntraOrgConnectorProtocolLogging to verbose

By setting the so-called IntraOrgConnectorProtocolLoggingLevel to verbose, protocol logging will be added to the Send connector protocol log. After sending a mail from a mailbox homed in Site B to a mailbox located on an Exchange 2007 Mailbox server in Site A, looking at the Send protocol log reveals that the Exchange Hub Transport server in Site B (Ex2007SE) uses the certificate offered by the Exchange Hub Transport server in the destination Active Directory site (Ex2007EE) to start Transport Layer Security, as can be seen in Figure 3.


Figure 3: Send Protocol Log between Active Directory Sites

A quick look at the certificate on the Hub Transport server available for TLS, shows that it is a self-signed certificate used (Figure 4).


Figure 4: Self Signed Certificate

EdgeSync

Once EdgeSync is configured between your internal Hub Transport servers and the Edge Transport server(s), both servers will use a certificate to encrypt their communication. In addition both certificates will be used as a means to provide direct trust. Direct trust is a method of authentication where a certificate can be used for authentication when the provided certificate is present in Active Directory (for the Hub Transport server role) or ADAM/LDS (for the Edge Transport server role). When setting up EdgeSync, the requested certificates are published in the correct location.

Opportunistic Transport Layer Security

Whenever a SMTP server opens a connection to the Exchange 2007 Hub/Edge Transport server role, Exchange will allow for opportunistic TLS, by offering its certificate.
Domain Security

Certificates can also be used by the Hub/Edge Transport server to configure Domain Security with partner organizations, both for encryption and authentication.

Client Access Server role and certificates

Client Access

Certificates are used by the Client Access server role to allow the communication flow to be encrypted between the Client Access server and its different clients. By default SSL is required for:

-Outlook Web Access
-Outlook Anywhere
-Exchange ActiveSync
-POP3
-IMAP4
-Exchange Web Services as Autodiscover, EWS, and Unified Messaging

Figure 5: Require SSL

The only virtual directory for which the use of a certificate is not required by default is the one that makes the Offline Address Book available for download by Microsoft Office Outlook 2007 clients and later.

Figure 6: OAB Virtual Directory does not require SSL by default

Certificate Based Authentication

It is possible to configure certificate based authentication, thereby allowing clients to authenticate themselves against the Client Access server by using their personal certificate. For more information.

Unified Messaging Server Role and Certificates

Certificates are used by the Unified Messaging Server role to encrypt the communication when sending a recorded Voice Mail message to the Exchange Hub Transport Server role. Certificates can also be used to encrypt the SIP and/or RTP traffic to the UM IP Gateway, and have to be used when you decide to deploy Office Communications Server in your environment, since Office Communications Server only communicates with other server roles through encryption.

What is all this about the Self-Signed Certificate?

When you deploy any Exchange 2007 Server role, except for the Mailbox Server role, Exchange will generate a self-signed certificate, and allow Exchange to use this certificate when required for the services IIS, SMTP, POP3, IMAP4, and UM.

Characteristics of this Self-Signed Exchange Certificate

Let us have a look at some of the features of this by default generated Self-Signed certificate.

Self-Signed certificates are only valid for one year

Self-Signed certificates are valid for one year, as can be seen in Figure 7, and will need to be renewed after a year.

Figure 7: Self-Signed Certificate only valid for one year

To renew a Self-Signed certificate, you can use the Exchange Management Shell cmdlet New-ExchangeCertificate. If you first grab the existing certificate by running Get-ExchangeCertificate, you can pipe the object to the cmdlet New-ExchangeCertificate, which will generate a new Self-Signed Certificate with the same settings, and enable it for the same services by default.

In Figure 8 you can see how the existing Self-Signed Certificate is renewed.

Figure 8: Renew an existing Self-Signed Certificate

The Exchange 2007 Client Access server only allows one certificate to be enabled for usage with IIS, but you can have multiple certificates enabled for POP, IMAP, UM, and SMTP. When multiple certificates are available, Exchange will select a certificate based on different criteria. I will come back this certificate selection process in part 2 of this article.

Self-Signed Certificate has by default one Common Name and two Subject Alternative Names

The Self-Signed certificate that is created when deploying Exchange 2007 will have its common name set to the Host name of the Exchange server, and have two Subject Alternative Names set to its Host name and its Fully Qualified Domain Name.

Figure 9: Self-Signed Certificate and its Subject and CertificateDomains

It is possible however to generate a Self-Signed Certificate with another Subject and Subject Alternative Names to make sure it can be used in your Exchange organization.

Using the Exchange Management Shell cmdlet New-ExchangeCertificate, you can create for example a certificate with Common Name webmail.proexchange.global, and then specify Subject Alternative Names like the Exchange server its Host and Fully Qualified Domain Name, as seen in Figure 10.

Do not forget to add the boolean parameter PrivateKeyExportable and set it to True, if you want to be able to export this Self-Signed certificate to enable your users to trust it (full details on this in part 2 of the article).

Figure 10: Generating a new Self-Signed Certificate with customized Subject Alternative Names

In part 2 of this article, I will come back to the required names of a certificate. In part 3 I will explain in more detail the used cmdlets.

Self-Signed Certificate are only trusted by its issuer

It is very important to know that the Self-Signed certificate is only trusted by the issuer of the certificate itself, which could break Exchange functionality if not configured correctly. Let us see what you need to consider if you decide to use the Self-Signed certificate:

Outlook Anywhere and Exchange ActiveSync do not support the use of a self-signed certificate

The Autodiscover web service will not check if the issuer of the certificate is trusted when launching Microsoft Office Outlook 2007 from a domain-joined client pc, but will complain about the certificate if you are using Microsoft Office Outlook 2007 from a non-domain-joined client pc, as shown in Figure 11.

Figure 11: Self-Signed certificate not trusted

When Microsoft Office Outlook 2007 clients (domain-joined or not) use the Exchange Web Services provided by the Microsoft Exchange Client Access server, they will be prompted by Outlook that the certificate is not issued by a company they have chosen not to trust. Figure 12 shows the Security Alert shown when someone requests Free and Busy information.

Figure 12: Self-Signed Certificate not trusted

Microsoft does support the use of Self-Signed certificates, but only for internal scenarios, like:

-To encrypt SMTP sessions between Hub Transport servers in different sites;

- To encrypt SMTP sessions between Hub Transport servers and Edge Transport servers;

- To encrypt the synchronization of configuration and recipient information by configuring EdgeSync between internal Hub Transport servers and Edge Transport server(s);

- To encrypt SMTP sessions between Unified Messaging servers and Hub Transport servers;

- To encrypt SIP and RTP sessions between Unified Messaging servers and Office Communications servers (this does require you to make sure that the Office Communication Mediation server trusts your Exchange server as the issuer of that Self-Signed certificate);

- To encrypt internal client access to Exchange (POP,IMAP,Outlook Web Access).
If you do not want Exchange to generate a self-signed certificate during installation, you can specify the /NoSelfSignedCertificates parameter next to Setup in the command prompt. Be careful: this parameter can only be used when installing the Client Access server role or the Unified Messaging server role. If your server does not have a valid certificate available to encrypt communication between clients and the Client Access server or the Unified Messaging server, communication will be unencrypted, and therefore, insecure.

Summary

In the first part of this 3-part article on certificates and Exchange, you have seen which Exchange 2007 components use certificates, and what characteristics the self-signed certificate carries. In part 2 of this article I will show how you can trust the self-signed certificate and I will cover the requirements of a certificate you need to keep in mind when getting your certificates. To end, in part 3 of this article I will give you a close look at the different Exchange Management Shell cmdlets that are available to create, manage, and remove Exchange certificates.

Saturday, November 29, 2008

Key features in the upcoming Windows Server 2008 R2

Microsoft plans to release an R2 edition of Windows Server 2008 in 2009 or 2010. Here are the key features of the R2 release that you need to know.
—————————————————————————————————————
When Windows Server 2008 R2 is released in 2009 or 2010 (that is the current projected timeframe), there will be some important features about this release. The most prominent is that Windows Server 2008 will solely be an x64 platform with the R2 release. This will make the upgrade to x64 platforms not really a surprise, as all current server class hardware is capable of 64-bit computing. There is one last window of time to get a 2008 release of Windows still on a 32-bit platform before R2 is released, so do it now for those difficult applications that don’t seem to play well on x64 platforms.
Beyond the processor changes, here are the other important features of the R2 release of Windows Server 2008:
Hyper-V improvements: The Hyper-V is planned to offer Live Migration as an improvement to the initial release of Quick Migration; Hyper-V will measure the migration time in milliseconds. This will be a solid point in the case for Hyper-V compared to VMware’s ESX or other hypervisor platforms. Hyper-V will also include support for additional processors and Second Level Translation (SLAT).
PowerShell 2.0: PowerShell 2.0 has been out in a beta release and Customer Technology Preview capacity, but it will be fully baked into Windows Server 2008 R2 upon its release. PowerShell 2.0 includes over 240 new commands, as well as a graphical user interface. Further, PowerShell will be able to be installed on Windows Server Core.
Core Parking: This feature of Windows Server 2008 will constantly assess the amount of processing across systems with multiple cores, and under certain configurations, suspend new work being sent to the cores. Then with the core idle, it can be sent to a sleep mode and reduce the overall power consumption of the system.
All of these new features will be welcome and add great functionality to the Windows Server admin. The removal of x86 support is not entirely a surprise, but the process needs to be set in motion now for how to address any legacy applications.

Kicking the tires with Perfmon in Windows Server 2008

Over the years, there have been very few changes in how we measure Windows performance. Windows Server 2008’s implementation of the Windows Reliability And Performance Monitor introduces new features to the venerable Perfmon tool.
—————————————————————————————————————
No matter what the screen’s title bar has labeled through the years, Perfmon is one of the most important tools a Windows administrator can have at their disposal. Windows Server 2008 brings new features to the table, while still providing the same counter functionality you are accustomed to using for troubleshooting and administering Windows servers. Here is a list of some of the key new functionality of the Windows Reliability And Performance Monitor (I’m still going to call it Perfmon) in Windows Server 2008.
Data Collector Set: This is a template of sorts of collector elements that you can frequently reuse. This makes it easy to compare the same collectors over different timeframes.
Reports: Perfmon now offers reports that provide graphic representations of a collector set’s captured information. This gives you a quick snapshot so you can compare system performance as recorded in the timeframe and with the selected counters. In this report, you can perform some basic manipulations to change display, highlight certain elements of the report, and export the image to a file. Figure A shows a Perfmon report.

Reliability Monitor: Perfmon now provides the System Stability Index (SSI) for a monitored system. This is another visual tool that you can use to identify when issues occur in a timeline fashion. It can be beneficial to see when a series of issues occurred, and if they went away or increased in frequency.
Wizard-based configuration: Counters can now be made up using a wizard interface. This can be beneficial when managers or other non-technical people may need access to development or proof-of-concept systems for basic performance information. Further, the security model per object can allow delegated permissions to make this easier to manage.
To get to Perfmon, you can still just run it from a prompt. The standard user access control (UAC) irritation applies to this console, but otherwise, getting there is easy.

Sunday, November 2, 2008

10 things you should know about Hyper-V

Hypervisor technology is software on which multiple virtual machines can run, with the hypervisor layer controlling the hardware and allocating resources to each VM operating system. Hyper-V is the virtualization platform that is included in Windows Server 2008. Microsoft also recently released a standalone version, called Hyper-V Server 2008, that’s available as a free download from the Microsoft Web site.
As server virtualization becomes more important to businesses as a cost-saving and security solution, and as Hyper-V becomes a major player in the virtualization space, it’s important for IT pros to understand how the technology works and what they can and can’t do with it.
In this article, we address 10 things you need to know about Hyper-V if you’re considering deploying a virtualization solution in your network environment.

Hypervisor technology is software on which multiple virtual machines can run, with the hypervisor layer controlling the hardware and allocating resources to each VM operating system. Hyper-V is the virtualization platform that is included in Windows Server 2008. Microsoft also recently released a standalone version, called Hyper-V Server 2008, that’s available as a free download from the Microsoft Web site.
As server virtualization becomes more important to businesses as a cost-saving and security solution, and as Hyper-V becomes a major player in the virtualization space, it’s important for IT pros to understand how the technology works and what they can and can’t do with it.
In this article, we address 10 things you need to know about Hyper-V if you’re considering deploying a virtualization solution in your network environment.
Note: This information is also available as a PDF download.
#1: To host or not to host?
Hyper-V is a “type 1″ or “native” hypervisor. That means it has direct access to the physical machine’s hardware. It differs from Virtual Server 2005, which is a “type 2″ or “hosted” virtualization product that has to run on top of a host operating system (e.g., Windows Server 2003) and doesn’t have direct access to the hardware.
The standalone version of Hyper-V will run on “bare metal” — that is, you don’t have to install it on an underlying host operating system. This can be cost effective; however, you lose the ability to run additional server roles on the physical machine. And without the Windows Server 2008 host, you don’t have a graphical interface. The standalone Hyper-V Server must be administered from the command line.
Note
Hyper-V Server 2008 is based on the Windows Server 2008 Server Core but does not support the additional roles (DNS server, DHCP server, file server, etc.) that Server Core supports. However, since they share the same kernel components, you should not need special drivers to run Hyper-V.
Standalone Hyper-V also does not include the large memory support (more than 32 GB of RAM) and support for more than four processors that you get with the Enterprise and DataCenter editions of Windows Server 2008. Nor do you get the benefits of high availability clustering and the Quick Migration feature that are included with the Enterprise and DataCenter editions.
#2: System requirements
It’s important to note that Hyper-V Server 2008 is 64-bit only software and can be installed only on 64-bit hardware that has Intel VT or AMD-V virtualization acceleration technologies enabled. Supported processors include Intel’s Pentium 4, Xeon, and Core 2 DUO, as well as AMD’s Opteron, Athlon 64, and Athlon X2. You must have DEP (Data Execution Protection) enabled (Intel XD bit or AMD NX bit). A 2 GHz or faster processor is recommended; minimum supported is 1 GHz.
Note
Although Hyper-V itself is 64-bit only, the guest operating systems can be either 32-bit or 64-bit.
Microsoft states minimum memory requirement as 1 GB, but 2 GB or more is recommended. Standalone Hyper-V supports up to 32 GB of RAM. You’ll need at least 2 GB of free disk space to install Hyper-V itself, and then the OS and applications for each VM will require additional disk space.
Also be aware that to manage Hyper-V from your workstation, you’ll need Vista with Service Pack 1.
#3: Licensing requirements
Windows Server 2008 Standard Edition allows you to install one physical instance of the OS plus one virtual machine. With Enterprise Edition, you can run up to four VMs, and the DataCenter Edition license allows for an unlimited number of VMs.
The standalone edition of Hyper-V, however, does not include any operating system licenses. So although an underlying host OS is not needed, you will still need to buy licenses for any instances of Windows you install in the VMs. Hyper-V (both the Windows 2008 version and the standalone) support the following Windows guest operating systems: Windows Server 2008 x86 and x64, Windows Server 2003 x86 and x64 with Service Pack 2, Windows 2000 Server with Service Pack 4, Vista x86 and x64 Business, Enterprise, and Ultimate editions with Service Pack 1, and XP Pro x86 and x64 with Service Pack 2 or above. For more info on supported guests, see Knowledge Base article 954958.
Hyper-V also supports installation of Linux VMs. Only SUSE Linux Enterprise Server 10, both x86 and x64 editions, is supported, but other Linux distributions are reported to have been run on Hyper-V. Linux virtual machines are configured to use only one virtual processor, as are Windows 2000 and XP SP2 VMs.
#4: File format and compatibility
Hyper-V saves each virtual machine to a file with the .VHD extension. This is the same format used by Microsoft Virtual Server 2005 and Virtual PC 2003 and 2007. The .VHD files created by Virtual Server and Virtual PC can be used with Hyper-V, but there are some differences in the virtual hardware (specifically, the video card and network card). Thus, the operating systems in those VMs may need to have their drivers updated.
If you want to move a VM from Virtual Server to Hyper-V, you should first uninstall the Virtual Machine Additions from the VM while you’re still running it in Virtual Server. Then, shut down the VM in Virtual Server (don’t save it, because saved states aren’t compatible between VS and Hyper-V).
VMware uses the .VMDK format, but VMware images can be converted to .VHD with the System Center Virtual Machine Manager (referenced in the next section) or by using the Vmdk2Vhd tool, which you can download from the VMToolkit Web site.
Note
Citrix Systems supports the .VHD format for its XenServer, and Microsoft, Citrix, and HP have been collaborating on the Virtual Desktop Infrastructure (VDI) that runs on Hyper-V and utilizes both Microsoft components and Citrix’s XenDesktop.
#5: Hyper-V management
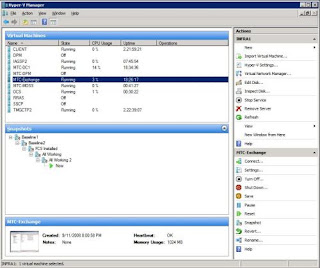
When you run Hyper-V as part of x64 Windows Server 2008, you can manage it via the Hyper-V Manager in the Administrative Tools menu. Figure A shows the Hyper-V console.
Figure A: The Hyper-V Management Console in Server 2008


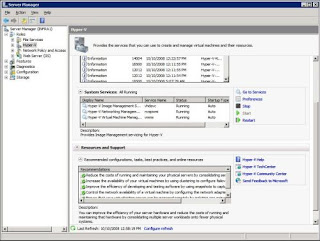
The Hyper-V role is also integrated into the Windows Server 2008 Server Manager tool. Here, you can enable the Hyper-V role, view events and services related to Hyper-V, and see recommended configurations, tasks, best practices, and online resources, as shown in Figure B.
Figure B: Hyper-V is integrated into Server Manager in Windows Server 2008.


The Hyper-V management tool (MMC snap-in) for Vista allows you to remotely manage Hyper-V from your Vista desktop. You must have SP1 installed before you can install and use the management tool. You can download it for 32-bit Vista or 64-bit Vista.
Tip
If you’re running your Hyper-V server and Vista client in a workgroup environment, several configuration steps are necessary to make the remote management tool work. See this article for more information.
Hyper-V virtual machines can also be managed using Microsoft’s System Center Virtual Machine Manager 2008, along with VMs running on Microsoft Virtual Server and/or VMware ESX v3. By integrating with SCCM, you get reporting, templates for easy and fast creation of virtual machines, and much more. For more information, see the System Center Virtual Machine Manager page.
Hyper-V management tasks can be performed and automated using Windows Management Instrumentation (WMI) and PowerShell.
#6: Emulated vs. synthetic devices
Users don’t see this terminology in the interface, but it’s an important distinction when you want to get the best possible performance out of Hyper-V virtual machines. Device emulation is the familiar way the virtualization software handles hardware devices in Virtual Server and Virtual PC. The emulation software runs in the parent partition (the partition that can call the hypervisor and request creation of new partitions). Most operating systems already have device drivers for these devices and can boot with them, but they’re slower than synthetic devices.
The synthetic device is a new concept with Hyper-V. Synthetic devices are designed to work with virtualization and are optimized to work in that environment, so performance is better than with emulated devices. When you choose between Network Adapter and Legacy Network Adapter, the first is a synthetic device and the second is an emulated device. Some devices, such as the video card and pointing device, can be booted in emulated mode and then switched to synthetic mode when the drivers are loaded to increase performance. For best performance, you should use synthetic devices whenever possible.
#7: Integration Components
Once you’ve installed an operating system in a Hyper-V virtual machine, you need to install the Integration Components. This is a group of drivers and services that enable the use of synthetic devices by the guest operating system. You can install them on Windows Server 2008 by selecting Insert Integration Services Setup Disk from the Action menu in the Hyper-V console. With some operating systems, you have to install the components manually by navigating to the CD drive.
#8: Virtual networks
There are three types of virtual networks you can create and use on a Hyper-V server:
Private network allows communication between virtual machines only.
Internal network allows communication between the virtual machines and the physical machine on which Hyper-V is installed (the host or root OS).
External network allows the virtual machines to communicate with other physical machines on your network through the physical network adapter on the Hyper-V server.
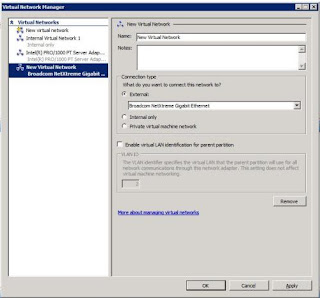
To create a virtual network, in the right Actions pane of the Hyper-V Manager (not to be confused with the Action menu in the toolbar of the Hyper-V console or the Action menu in the VM window), click Virtual Network Manager. Here, you can set up a new virtual network, as shown in Figure C.
Figure C: Use the Virtual Network Manager to set up private, internal, or external networks.


Note that you can’t use a wireless network adapter to set up networking for virtual machines, and you can’t attach multiple virtual networks to the same physical NIC at the same time.
#9: Virtual MAC addresses
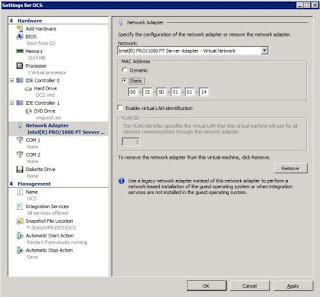
In the world of physical computers, we don’t have to worry much about MAC addresses (spoofing aside). They’re unique 48-bit hexadecimal addresses that are assigned by the manufacturer of the network adapter and are usually hardwired into the NIC. Each manufacturer has a range of addresses assigned to it by the Institute of Electrical and Electronics Engineers (IEEE). Virtual machines, however, don’t have physical addresses. Multiple VMs on a single physical machine use the same NIC if they connect to an external network, but they can’t use the same MAC address. So Hyper-V either assigns a MAC address to each VM dynamically or allows you to manually assign a MAC address, as shown in Figure D.
Figure D: Hyper-V can assign MAC addresses dynamically to your VMs or you can manually assign a static MAC address.


If there are duplicate MAC addresses on VMs on the same Hyper-V server, you will be unable to start the second machine because the MAC address is already in use. You’ll get an error message that informs you of the “Attempt to access invalid address.” However, if you have multiple virtualization servers, and VMs are connected to an external network, the possibility of duplicate MAC addresses on the network arises. Duplicate MAC addresses can cause unexplained connectivity and networking problems, so it’s important to find a way to manage MAC address allocation across multiple virtualization servers.
#10: Using RDP with Hyper-V
When you use a Remote Desktop Connection to connect to the Hyper-V server, you may not be able to use the mouse or pointing device within a guest OS, and keyboard input may not work properly prior to installing the Integration Services. Mouse pointer capture is deliberately blocked because it behaves erratically in this context. That means during the OS installation, you will need to use the keyboard to input information required for setup. And that means you’ll have to do a lot of tabbing.
If you’re connecting to the Hyper-V server from a Windows Vista or Server 2008 computer, the better solution is to install the Hyper-V remote management tool on the client computer.
Additional resources
Hyper-V is getting good reviews, even from some pundits who trend anti-Microsoft. The release of the standalone version makes it even more attractive. IT pros who want to know more can investigate the Microsoft Learning resources related to Hyper-V technology, which include training and certification paths, at the Microsoft Virtualization Learning Portal.

10+ reasons to treat network security like home security

As I pack up my various technical references and novels in preparation for moving, it occurs to me that the front door of your house can teach you some things about IT security.
#1: Deadbolts are more secure than the lock built into the handle.
Not only are they sturdier, but they’re harder to pick. On the other hand, both of these characteristics are dependent on design differences that make them less convenient to use than the lock built into the handle. If you’re in a hurry, you can just turn the lock on the inside handle and swing the door shut — it’ll lock itself and you don’t need to use a key, but the security it provides isn’t quite as complete. A determined thief can still get in more easily than if you used a deadbolt, and you may find the convenience of skipping the deadbolt evaporates when you lock your keys inside the house.
The lesson: Don’t take the easy way out. It’s not so easy when things don’t go according to plan.
#2: Simply closing your door is enough to deter the average passerby, even if he’s the sort of morally bankrupt loser that likes thefts of opportunity.
If it looks locked, most people assume it is locked. This in no way deters someone who’s serious about getting into the house, though.
The lesson: Never rely on the appearance of security. The best way to achieve that appearance is to make sure you’re actually secure.
#3: Even a deadbolt-locked door is only as secure as the doorframe.
If you have a solid-core door with strong, tempered steel deadbolts set into a doorframe attached to drywall with facing tacks, one good kick will break the door open without any damage to your high-quality door and deadbolt. The upside is that you’ll be able to reuse the door and locks. The downside is that your 70-inch HD television will be fenced by daybreak.
The lesson: The security provided by a single piece of software is only as good as the difficulty of getting around it. Don’t assume security crackers will always use the front door the way it was intended.
#4: It’s worse than the doorframe.
How secure is the window next to the front door?
The lesson: Locking down your firewall won’t protect you against Trojans received via e-mail. Try to cover every point of entry or you may as well not cover any of them.
#5: When someone knocks on the front door, you might want to see who’s out there before you open it.
That’s why peepholes were invented. Similarly, if you hear the sounds of lockpicks (or even a key, when you know nobody else should have one), you shouldn’t just open the door to see who it is. It might be someone with a knife and a desire to loot your home.
The lesson: Be careful about what kind of outgoing traffic you allow — and how your security policies deal with it. For instance, most stateful firewalls allow incoming traffic on all connections that were established from inside, so it behooves you to make sure you account for all allowable outgoing traffic.
#6: Putting a sign in your window that advertises an armed response alarm system, or even an NRA membership sticker, can deter criminals who would otherwise be tempted to break in.
Remember that the majority of burglars in the United States admit to being more afraid of armed homeowners than the police, even after they’ve been apprehended. Telling people about strong security helps reduce the likelihood of being a victim.
The lesson: Secrecy about security doesn’t make anyone a smaller target.
#7: A good response to a bad situation requires knowing about the bad situation.
If someone breaks into your house, bent on doing you and your possessions harm, you cannot respond effectively without knowing there’s an intruder. Make sure you — or someone empowered to act on your behalf, such as an armed security response service, the police, or someone else you trust — have some way of knowing when someone has broken in.
The lesson: Intrusion detection and logging are more useful than you may realize. You might notice someone has compromised your network and planted botnet Trojans before they’re put to use, or you might log information that can help you track down the intruder or recover from the security failure (and prevent a similar one in the future).
#8: Nobody thinks of everything.
Maybe someone will get past your front (or back) door, despite your best efforts. Someone you trust enough to let inside may even turn out to be less honest than you thought. Layered security, right down to careful protection of your valuables and family, even from inside your house, is important in case someone gets past the outer walls of your home. Extra protection, such as locks on interior doors and a safe for valuables, can make the difference between discomfort and disaster.
The lesson: Protect the inside of your network from itself, as well as from the rest of the world. Encrypted connections, such as SSH tunnels even between computers on the same network, might save your bacon some day.
#9: The best doors, locks, window bars, safes, and security systems cannot stop all of the most skilled and determined burglars from getting inside all of the time.
Once in a while, someone can get lucky against even the best home security. Make sure you insure your valuables and otherwise prepare for the worst.
The lesson: Have a good disaster recovery plan in place — one that doesn’t rely on the same security model as the systems that need to be recovered in the event of a disaster. Just as a safety deposit box can be used to protect certain rarely used valuables, offsite backups can save your data, your job, and/or your business.
#10: Your house isn’t the only place you need to be protected.
A cell phone when your car breaks down, a keen awareness of your surroundings, and maybe some form of personal protection can all be the difference between life and death when you’re away from home. Even something as simple as accidentally leaving your wallet behind in a restaurant can lead to disaster if someone uses your identity to commit other crimes that may be traced back to you, to run up your credit cards, and to loot your bank accounts. Your personal security shouldn’t stop when you leave your house.
The lesson: Technology that leaves the site, information you may take with you, such as passwords, and data you need to share with the outside world need to be protected every bit as much as the network itself.
I promised 10+ in the title of this article. This bonus piece of the analogy turns it around and gives you a different perspective on how to think about IT security:
#11: Good analogies go both ways.
Any basic security principles that apply to securing your network can also apply to securing your house or even the building that houses the physical infrastructure of your network.
The lesson: Don’t neglect physical security. The best firewall in the world won’t stop someone from walking in the front door empty-handed, then walking out with thousands of dollars in hardware containing millions of dollars’ worth of data. That’s a job for the deadbolt.
Okay, back to packing. I’ve procrastinated enough.

The 10 best IT certification Web sites

It’s no surprise that a ranking of the top IT certification Web sites would change in six years, which is when I last published such a list for TechRepublic. What is surprising is just how much the IT certification landscape has changed.
Since I drafted the first version of this article back in the spring of 2002, the economy has seen many ups and downs. As of late, there have been a good many more downs than ups. In response, increasing numbers of computer, programming, and other technical professionals are scrambling to do all they can to strengthen their resumes, boost job security, and make themselves more attractive to their current employers. Toward that end, certifications can play an important role.
But that’s not what industry certification was about just a short six or seven years ago. No, certifications then were a key tool that many job changers wielded to help solidify entry into the IT field from other industries. When technical skills were in higher demand, technology professionals leveraged IT certifications for greater pay within their organizations or to obtain better positions at other firms.
As many career changers subsequently left IT over the years, and as most technology departments — under the reign of ever-tightening staffing budgets — began favoring real world skills, certifications lost some luster. But even like a tarnished brass ring, there’s still significant value in the asset. You just have to mine it properly.
Technology professionals, accordingly, should update their thinking. Gone should be the old emphasis placed on brain dumps and test cram packages. In their place should be a renewed focus on career planning, job education, and training. Instead of viewing IT certification as a free ticket, which it most certainly isn’t (and never was), technology professionals should position certifications as proof of their commitment to continued education and as a career milepost — an accomplishment that helps separate themselves from others in the field.
Fortunately, there remain a great many resources to help dedicated technology professionals make sense of the ever-changing certification options, identify trustworthy and proven training resources, and maximize their certification efforts. Here’s a look at today’s 10 best IT certification Web sites.
#10: BrainBuzz’s CramSession
CramSession, early on, became one of the definitive, must-visit Web sites. With coverage for many Cisco, CompTIA, Microsoft, Novell, Red Hat, and other vendor certifications, the site continues to deliver a wealth of information.
The site is fairly straightforward. While it appears design improvements aren’t at the top of BrainBuzz’s list (the site’s not the most attractive or visually appealing certification destination, as evidenced by some missing graphics and clunky layouts on some pages), most visitors probably don’t care. As long as IT pros can find the resources they seek — and the site is certainly easily navigable, with certifications broken down by vendor and exam — they’ll continue coming back.
In addition to the site’s well-known study guides, which should be used only as supplements and never as the main training resources for an exam, you’ll find certification and exam comparisons, career track information, and practice tests, not to mention audio training resources.
#9: Windows IT Pro
CertTutor.net is one of the Web sites that made the previous top 10 list. It did not, however, make this revised list. Instead, Windows IT Pro magazine’s online site takes its place.
The long-running Penton publication is a proven tool for many tech pros. CertTutor.net used to be part of the magazine’s trusted network of properties, but the certification content has essentially been integrated throughout its larger overall Web site. Certification forums are mixed in throughout the regular forums. For example, the Microsoft IT Professional Certification topic is listed within the larger Windows Server System category, while security and messaging exams receive their own category.
Within its Training and Certification section, visitors will also find current articles that track changes and updates within vendors’ certification programs. Such news and updates, combined with the site’s how-to information and respected authors, make it a stop worth hitting for any certification candidate.
#8: Redmond Magazine
Microsoft Certified Professional Magazine, long a proven news and information resource for Microsoft certified professionals, became Redmond Magazine in late 2004. Thankfully, the Redmond Media Group continues to cover certification issues and maintain an online presence for Microsoft Certified Professional Magazine.
MCPmag, as the online presence is known, may remain the best news site for Microsoft professionals looking to keep pace with changes and updates to Microsoft’s certification tracks. In addition to timely certification and career articles, the site boasts industry-leading salary survey and statistical information. Visitors will also find dedicated certification-focused forums, numerous reviews of exam-preparatory materials, and a wide range of exam reviews (including for some of the latest certification tests, such as Windows Server 2008 and Windows Vista desktop support).
#7: Certification Magazine
Besides a Salary Calculator, the Certification Magazine Web site includes another can’t-miss feature: news. For certification-related news, updates, and even white papers across a range of tracks — a variety of programs are covered, from IBM to Sun to Microsoft — it’s hard to find another outlet that does as good a job either creating its own certification content or effectively aggregating related contextual information from other parties.
That information alone makes the site worth checking out. Add in study guides, timely articles, and overviews of different vendors’ certification programs, and Certification Magazine quickly becomes a trustworthy source for accreditation information.
#6: Cert Cities
CertCities.com (another Redmond Media Group property) also publishes a wealth of original certification articles. Site visitors will find frequently updated news coverage as well.
From regular columns to breaking certification news, IT pros will find CertCities an excellent choice for helping stay current on changes within certification’s ever-changing tracks and programs. But that’s not all the site offers.
CertCities.com also includes dedicated forums (including comprehensive Cisco and Microsoft sections and separate categories for IBM, Linux/UNIX, Java, CompTIA, Citrix, and Oracle tracks, among others), as well as tips and exam reviews. There’s also a pop quiz feature that’s not to be missed. While not as in-depth as entire simulation exams, the pop quizzes are plentiful and can be used to help determine exam readiness.
#5: InformIT
Associated with Pearson Education, the InformIT Web site boasts a collection of ever-expanding certification articles, as well as a handful of certification-related podcasts. You’ll also find certification-related video tutorials and a helpful glossary of IT certification terms.
But that’s not the only reason I list InformIT in the top 10. The site also provides an easy link to its Exam Cram imprint. I’ve never taken a certification exam without first reading and rereading the respective Exam Cram title. I continue recommending them today.
#4: Prometric
Of course, if you’re going to become certified, you have to take the exam. Before you can take the exam, you have to register.
Prometric bills itself as “the leading provider of comprehensive testing and assessment services,” and whether you agree or not, if you’re going to schedule an IT certification exam, visiting the Prometric Web site is likely a required step. The company manages testing for certifications from Apple, CompTIA, Dell, Hewlett-Packard, IBM, Microsoft, Nortel, the Ruby Association, Ubuntu, and many others. Thus, it deserves a bookmark within any certification candidate’s Web browser.
#3: PrepLogic
Training and professional education are critical components of certification. In fact, they’re so important in a technology-related career that I’d rather see computer technicians and programmers purchasing and reviewing training materials than just trying to earn a new accreditation.
While there’s certainly been a shake-out in the last few years, a large number of vendors continue to develop and distribute self-paced training materials. As I have personal experience with PrepLogic’s training aids, I believe the company earns its spot this revised top 10 list.
With a large assortment of video- and audio-based training aids across a range of vendor tracks, PrepLogic develops professional tools that can be trusted to help earn certification. Visitors will also find Mega Guides that cover all exam objectives.
Other training aid providers that deserve mention include QuickCert, a Microsoft Certified Partner and CompTIA Board Member that provides guaranteed computer-based training programs, and SkillSoft, which delivers online training programs covering tracks from Check Point, CIW, IBM, Microsoft, Oracle, PMI, Sun Microsystems, and others.
#2: Transcender
Just as I never attempted a certification exam before studying the relevant Exam Cram title, I also never sat an accreditation test before ensuring I could pass the respective Transcender simulations. The method worked well for some 10 IT certification exams.
Whether it’s the confidence these practice tests provide or that the actual simulation so well replicates the real-world exam, I’m not sure. All I know is I always recommend candidates spend hours with practice exams after completing classroom or self-paced course instruction. And, when it comes to simulation exams, I’m a believer in Transcender products. I’ve repeatedly used them and always found them to be an integral component of my certification preparation strategy.
Other outlets offering quality simulation tests include MeasureUp and PrepLogic (previously mentioned). All three companies (Transcender, MeasureUp, and PrepLogic) develop practice tests for a large number of technology certifications, including Cisco, Citrix, CompTIA, Microsoft, and Oracle.
#1: The certification provider’s own Web site
The most important site, though, when preparing for an IT training exam is the certification sponsor’s own Web site. Nowhere else are you as likely to find more accurate or timely news, information, and updates regarding a certification program. Vendor sites are also an excellent source for officially approved study aids and training guides.
So if you’re considering a Microsoft certification, don’t skip the basic first step: Thoroughly research and review Microsoft’s Training and Certification pages. The same is true if you’re considering a Cisco, CompTIA, Dell, or other vendor accreditation; their respective training and certification pages can prove invaluable.
It’s always best to begin your certification quest by visiting the vendor’s site. And to avoid unpleasant surprises, be sure to revisit often as you continue your certification quest.
Those are mine…
That’s my list of the 10 best certification Web sites. What are yours? Post your additions by joining the discussion below.

10 dumb things IT pros do that can mess up their networks

One of the most popular pastimes of IT professionals is complaining about the dumb things users do. But if we’re honest, we have to admit that computer novices aren’t the only ones who make mistakes. Most network administrators could (but probably won’t) tell you about their “most embarrassing moment.” That’s the one where you discover you accidentally misconfigured the firewall to shut down the boss’s Internet connection or that the backup you’ve been making every day has been copying the wrong files. Oops.
#1: Don’t have a comprehensive backup and disaster recovery plan
It’s not that backing up is hard to do. The problem is that it sometimes gets lost in the shuffle, because most network administrators are overloaded already, and backups are something that seem like a waste of time and effort–until you need them.
Of course you back up your organization’s important data. I’m not suggesting that most admins don’t have a backup strategy in place. But many of those backup strategies haven’t changed in decades. You set up a tape backup to copy certain important files at specified intervals and then forget about it. You don’t get around to assessing and updating that backup strategy — or even testing the tapes periodically to make sure your data really is getting backed up — until something forces you to do so (the tape system breaks or worse, you have a catastrophic data loss that forces you to actually use those backups).
It’s even worse when it comes to full-fledged disaster recovery plans. You may have a written business continuity plan languishing in a drawer somewhere, but is it really up to date? Does it take into account all of your current equipment and personnel? Are all critical personnel aware of the plan? (For instance, new people may have been hired into key positions since the time the plan was formulated.) Does the plan cover all important elements, including how to detect the problem as quickly as possible, how to notify affected persons, how to isolate affected systems, and what actions to take to repair the damage and restore productivity?
#2: Ignore warning signs
That UPS has been showing signs of giving up the ghost for weeks. Or the mail server is suddenly having to be rebooted several times per day. Users are complaining that their Web connectivity mysteriously drops for a few minutes and then comes back. But things are still working, sort of, so you put off investigating the problem until the day you come into work and network is down.
As with our physical health, it pays to heed early warning signs that something is wrong with the network and catch it before it becomes more serious.
#3: Never document changes
When you make changes to the server’s configuration settings, it pays to take the time to document them. You’ll be glad you did if a physical disaster destroys the machine or the operating system fails and you have to start over from scratch. Circumstances don’t even have to be that drastic; what if you just make new changes that don’t work the way you expected, and you don’t quite remember the old settings?
Sure, it takes a little time, but like backing up, it’s worth the effort.
#4: Don’t waste space on logging
One way to save hard disk space is to forego enabling logging or set your log files to overwrite at a small file size threshold. The problem with that is that disk space is relatively cheap, but hours of pulling your hair out when you’re trying to troubleshoot a problem without logs to help you discover what happened can be costly, in terms of both money and frustration.
Some applications don’t have their logs turned on automatically. But if you want to save yourself a lot of grief when something goes wrong, adopt the philosophy of “everything that can be logged should be logged.”
#5: Take your time about installing critical updates
The “It’ll never happen to me” syndrome has been the downfall of many networks. Yes, updates and patches sometimes break important applications, cause connectivity problems, or even crash the operating system. You should thoroughly test upgrades before you roll them out to prevent such occurrences. But you should do so as quickly as possible and get those updates installed once you’ve determined that they’re safe.
Many major virus or worm infestations have done untold damage to systems even though the patches for them had already been released.
#6: Save time and money by putting off upgrades
Upgrading your operating systems and mission-critical applications can be time consuming and expensive. But putting off upgrades for too long can cost you even more, especially in terms of security. There are a couple of reasons for that:
New software usually has more security mechanisms built in. There is a much greater focus on writing secure code today than in years past.
Vendors generally retire support for older software after awhile. That means they stop releasing security patches for it, so if you’re running the old stuff, you may not be protected against new vulnerabilities.
If upgrading all the systems in your organization isn’t feasible, do the upgrade in stages, concentrating on the most exposed systems first.
#7: Manage passwords sloppily
Although multifactor authentication (smart cards, biometrics) is becoming more popular, most organizations still depend on user names and passwords to log onto the network. Bad password policies and sloppy password management create a weak link that can allow attackers to invade your systems with little technical skill needed.
Require lengthy, complex passwords (or better, passphrases), require users to change them frequently, and don’t allow reuse of the same passwords over and over. Enforce password policies through Windows group policy or third-party products. Ensure that users are educated about the necessity to keep passwords confidential and are forewarned about the techniques that social engineers may use to discover their passwords.
If at all possible, implement a second authentication method (something you have or something you are) in addition to the password or PIN (something you know).
#8: Try to please all the people all of the time
Network administration isn’t the job for someone who needs to be liked by everyone. You’ll often be setting down and enforcing rules that users don’t like. Resist the temptation to make exceptions (”Okay, we’ll configure the firewall to allow you to use instant messaging since you asked so nicely.”)
It’s your job to see that users have the access they need to do their jobs — and no more.
#9: Don’t try to please any of the people any of the time
Just as it’s important to stand your ground when the security or integrity of the network is at stake, it’s also important to listen to both management and your users, find out what they do need to do their jobs, and make it as easy for them as you can–within the parameters of your mission (a secure and reliable network).
Don’t lose sight of the reason the network exists in the first place: so that users can share files and devices, send and receive mail, access the Internet, etc. If you make those tasks unnecessarily difficult for them, they’ll just look for ways to circumvent your security measures, possibly introducing even worse threats.
#10: Make yourself indispensable by not training anyone else to do your job
This is a common mistake throughout the business world, not just in IT. You think if you’re the only one who knows how the mail server is configured or where all the switches are, your job will be secure. This is another reason some administrators fail to document the network configuration and changes.
The sad fact is: no one is indispensable. If you got hit by a truck tomorrow, the company would go on. Your secrecy might make things a lot more difficult for your successor, but eventually he or she will figure it out.
In the meantime, by failing to train others to do your tasks, you may lock yourself into a position that makes it harder to get a promotion… or even take a vacation.