Saturday, April 25, 2009

Working With Terminal Services Remote Applications (Part 3)

Introduction

In the previous part of this article series, I walked you through the process of hosting the Windows Calculator as a remote application. While that was a neat trick, I did things the quick and dirty way, in an effort to quickly show you what was possible with Terminal Service RemoteApp. In this article, I want to take a step back and show you some of the settings that I did not really get to discuss in the previous article.

The RemoteApp Wizard

Now that I have demonstrated the Terminal Service RemoteApp feature, I want to work through the RemoteApp Wizard one more time, and take more time to explain things as I go. You can launch the RemoteApp Wizard by opening the TS RemoteApp Manager, and clicking on the Add RemoteApp Programs link found in the Actions pane.

When the RemoteApp Wizard opens, click Next to bypass the wizard’s Welcome screen. At this point, you should see a list of the applications that are available for remote hosting, as shown in Figure A. You can select the check box next to any application that you want to host, or you can use the Browse button to locate the executable file for any application that is not on the list.

Figure A: Select the applications that you want to host remotely

One thing that I want to mention quickly is that by default, this list will only show you applications that have been installed for use with the Terminal Services. You can host any application on the server, but unless an application has been installed specifically for use with the Terminal Services, there is no guarantee that the application will run correctly.

If you look at the figure above, you will notice that this particular dialog box contains a Properties button. If you select an application and click this button, you will see a dialog box that tells you the application’s name and its local path. That way, you can verify that you are hosting the correct application. You can see what this dialog box looks like in Figure B.
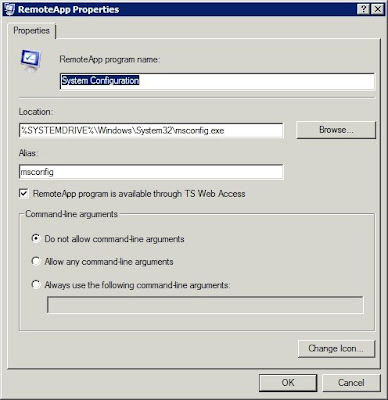

Figure B: The application’s properties sheet provides you with detailed information about the application that you have selected

What is more important though, is that sometimes an application will be configured to use various command line switches. Clicking the Properties button gives you the chance to verify that no switches are being used in conjunction with the application when it is run locally. If any switches are being used, and you need to keep using the switch when you run the application locally on the server, then you can use the Properties dialog box to prevent command line switches from being used by those who are running the application remotely. Conversely, you can also require command line switches to be used when remote users execute the application.

After you have selected the applications that you want to host, and you have verified any existing command line arguments, click Next. When you do, Windows will show you a summary of the applications that you are about to remotely host. Click Finish, and the application will be added to the list of RemoteApp programs.

Exporting RemoteApp Settings

At this point, we could generate an RDP file for the application if we wanted to, but I wanted to take a moment and show you the export and import features for remote applications. Hosting remote applications does not tend to be quite as resource intensive for a terminal server as hosting a full blown Windows desktop, but applications still consume server resources. This is especially true if you have multiple users who are all using multiple remotely hosted applications.

Depending on the workload that the users place on the terminal server, one terminal server may not able to handle the user’s demand on its own. You may end up having to deploy multiple terminal servers in the name of scalability and fault tolerance.

If you do end up having to deploy multiple terminal servers, then you will be happy to know that you do not have to configure your remote applications separately on each server. You do have to install the remote applications on each individual server; there is no getting around that requirement. However, you do not have to manually specify which applications are being remotely hosted.

Once you have one RemoteApp server configured, you can click the Export RemoteApp Settings link that is located in the TS RemoteApp Manager’s Actions pane. When you do, Windows will display the dialog box that is shown in Figure C.
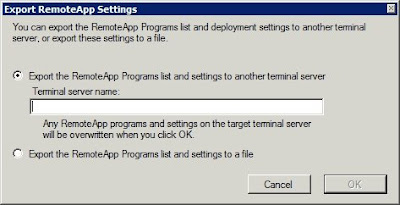
Figure C: The TS RemoteApp Manager allows you to export remote application settings to other servers

As you can see in the figure, you have the option of either specifying the name of a terminal server that you want to export the settings to, or you can export the settings to a file. If you choose to export the settings directly to another terminal server, then any RemoteApp settings that are presently configured on that server will be overwritten.

If you decide to export the RemoteApp settings to a file, then you can use the Import RemoteApp Settings link, found in the TS RemoteApp Manager’s Actions pane to import the settings into the new terminal server. Like the direct export method though, importing a settings file will cause any existing remote application settings to be overwritten.

Creating an RDP File

I showed you how to create an RDP file for a remote application in my previous article. However, I wanted to wrap things up by revisiting some of the settings that I didn’t get to talk about in the previous article.

You can create an RDP file by selecting an application from the RemoteApp Program list, and clicking the Create RDP File link, found in the System Configuration section. This will cause Windows to launch the RemoteApp Wizard.

Click next to bypass the wizard’s Welcome screen, and you will be taken to the screen that is shown in Figure D. If you look at the figure, you can see that the first option that this dialog box gives you is the location to which you want to save the RDP files that you generate. By default, RDP files are placed in the C:\Program Files\Packaged Programs folder, but the location is customizable.

Figure D: There are a lot of options that you can configure when generating an RDP file

The next section lists the terminal server that is hosting the remote application, the port number that should be used by the RDP session, and whether or not the server requires authentication. The default settings will typically work fine, but you do have the option of clicking the Change button to change these settings.

One particular situation that would require you to make a change would be if the remote applications were being hosted by a terminal server farm instead of by an individual server. In such a case, you would need to provide the farm’s fully qualified domain name.

The next section down is the Terminal Service Gateway Settings section. You would not normally have to do anything here, because gateway settings are detected automatically. Microsoft does provide you with a Change button that you can use in case the gateway settings are detected incorrectly though.

The last section is the Certificate Settings section. You would use this section if you normally use a certificate to sign the applications that you publish.

Once you have entered the desired settings, click Next, followed by Finish, and the RDP file will be generated.

Conclusion

If you have followed along and performed the steps that I have outlined in this article series, then you might have noticed that the TS RemoteApp Manager contains options for using remote applications with Terminal Service Web Access. I will show you how this works in the next part of this article series.

Working With Terminal Services Remote Applications (Part 2)

Introduction

In the first part of this article series, I talked about some of the benefits associated with using Terminal Services RemoteApp. In this article, I want to continue my discussion by guiding you through the deployment process.

Before We Begin

Before I get started, I need to point out that the Terminal Service RemoteApp feature is different from a normal Terminal Service session. Because of the inherent differences, not all Windows clients will be able to work with remotely hosted applications. Terminal Service RemoteApp only works with clients that are running Windows Vista, Windows Server 2008, Windows XP with SP2 or higher installed, and Windows Server 2003 with SP1 or higher and the new Remote Desktop Client installed.
Installing the Terminal Services
Let’s get started with the installation process. For the purposes of this article series, I am going to assume that you have already installed Windows Server 2008, and that you have joined the server to the appropriate domain.

Begin the installation process by opening the Server Manager, and selecting the Roles container. Next, click the Add Roles link, located in the Actions pane. This will cause Windows to launch the Add Roles wizard.

Click Next to bypass the wizard’s Welcome screen, and you will be taken to a screen that lists the various roles that are available on the server. Select the Terminal Services role, and click Next. Windows should now display a screen that serves as an introduction to the Terminal Services. Go ahead and click Next, and you will be taken to a screen that allows you to select the role services that you want to install. For right now, go ahead and choose the Terminal Server role and the TS Licensing Role.

For the sake of this article series, I am assuming that you do not have an existing Windows 2008 terminal service deployment in place. We are selecting the TS Licensing role, because Microsoft requires all terminal servers to be connected to a licensing server, although there is a grace period before you actually have to license your servers.

Go ahead and click Next, and you will see a warning message that tells you that any applications that were installed prior to the installation of the terminal services may not work with the Terminal Services. Go ahead and click Next to ignore this warning.

Windows will now display a screen that asks you if you want to perform network level authentication. Network level authentication is a new mechanism that allows Windows to perform user authentication before a full blown Terminal Service session is established. Network level authentication is generally considered to be a good thing, because it simplifies the authentication process and conserves server resources. Even so, only clients running Windows Vista and Windows Server 2008 support network level authentication. Therefore, you will want to carefully consider whether or not network level authentication should be enabled. For the purposes of this article series, I will be enabling network level authentication.

The next screen that you will be taken to asks you if you want to use per user or per device licensing. You can choose either one, but the option that you choose must correspond to the type of Terminal Server licenses that you have actually purchased.

Click Next, and Windows will ask you which users and groups should be allowed to connect to the terminal server. For now, just click Next to accept the defaults.

You will now see a screen asking you to make a decision about the discovery scope. What this means is that you have to decide whether your licensing server should only service terminal servers that are members of the same domain as the licensing server, or if you want the licensing server to service the entire forest. Once again, you are going to have to select the option that is the most appropriate for your own organization, and then click Next.

At this point, the wizard should display a summary of the installation options that you have chosen. I recommend that you take a moment or two to read over the installation summary just to make sure that the correct options have been selected. After doing so, click the Install button. Windows will now install the requested services. When the installation process completes, click the Close button. You will now be prompted to restart your server. Go ahead and click Yes to reboot the server.

RemoteApp

Now that we have got a basic Terminal Service deployment established, I want to give you a quick preview of what RemoteApp can do. In the next part of the series, I will go back and do some fine tuning and show you some other options for application hosting.

In the interest of simplicity, let us start out by hosting the Windows Calculator. To do so, click the Start button and choose the Administrative Tools Terminal Services TS RemoteApp Manager options from the Start menu.

When the RemoteApp Manager starts, select the Add RemoteApp Programs link from the Actions menu. When you do, Windows will launch the RemoteApp Wizard. Click Next to bypass the wizard’s Welcome screen, and you will be taken to a list of the applications that are installed on your terminal server. Select the check box corresponding to Calculator, and click Next, followed by Finish. You should now see the Windows Calculator added to the list of RemoteApp Programs, as shown in Figure A.

Figure A: The Windows Calculator has been added to the list of RemoteApp Programs

When you select the listing for the Calculator, a number of additional options become available on the Actions pane. Click the Create .RDP File option. This will cause Windows to launch the RemoteApp Wizard.

Once again, click Next to bypass the wizard’s Welcome screen. You should now see a screen that asks you to enter a bunch of different options related to the remote application. Our goal for right now is to simply try out a remote application, so change the Location to Save the Package field to point to a network share that is accessible from a client machine. Do not worry about any of the other settings for now. I will address them later in this series.

Click Next, followed by Finish, and Windows will create a custom RDP file and place it into the location that you have specified. An RDP file is a Remote Desktop file. RDP files are normally used to establish Terminal Service sessions with remote machines, but in this case, the RDP file is application specific. If we open the RDP file from a client machine, the client will launch the Calculator (keep in mind that right now the Administrator is the only user who has access to the Calculator). If you look at Figure B, you can see that the Calculator appears to be running locally. The only indication that it is a hosted application is the word Remote in the bar at the bottom of the screen.

Figure B: This is what a RemoteApp looks like when it is running

Conclusion

In this article, I have shown you the basics for hosting an application. In the next part of this article series, I want to take a step back, and show you how to fine tune the application hosting experience.

Working With Terminal Services Remote Applications (Part 1)

Introduction

Back in the fall of 2006, I wrote an article for this site regarding a new Windows Server 2008 feature called Terminal Services Remote Programs. At the time that I wrote that article, Windows Server 2008 was still in beta testing. Since that time, Microsoft has renamed Windows Terminal Services Remote Programs to Terminal Service RemoteApp. There have also been some other changes in regard to how this feature works. That being the case, I wanted to revisit the topic and discuss Windows Server 2008’s Terminal Service RemoteApp feature.

What is Terminal Service RemoteApp?

Over the past couple of years, a lot of software publishers have been experimenting with offering hosted services. The basic idea behind a hosted services architecture is that an organization does not have to purchase licenses for software applications or have the hassles of installing or maintaining those applications. Instead, an ISP or a software vendor leases the applications to the organization. The application actually runs on the service provider’s servers, and users interact with the application over the Internet.

I have to tell you that I am not exactly a big fan of hosted services. Leasing applications is almost always more expensive in the long run, because the sum total of all those monthly payments eventually exceeds what it would have cost to simply purchase the software licenses.

There are some other drawbacks as well. For starters, hosted services takes an application’s configuration out of an organization’s direct control, and I have also known of several situations in which network administrators were put out of a job because the companies that they work for decided to outsource all of their applications to a hosting provider.

Even if job security and total cost of ownership are not issues for you though, there is one major compelling argument against the use of hosted services. If your Internet connection goes down, then nobody can access to the hosted applications. Of course Internet service is more reliable in some areas than others, but my ISP drops my connection all the time. I can’t imagine making access to my mission critical applications dependent on my ISP’s ability to maintain my Internet connection.

Even though I am not particularly fond of hosted services, the truth is that nobody would use hosted services if there were not some kind of benefit to it. The primary benefit is that the service provider takes care of all of the application maintenance for you.

So what does all of this have to do with Terminal Service RemoteApp? Well, Terminal Service RemoteApp is similar to the software that the hosting providers use to provide hosted services to their clients. Since it comes with Windows Server 2008, Terminal Service RemoteApp essentially allows you to bring the application hosting in house rather than outsourcing it to a service provider.

The Benefits of Using Terminal Service RemoteApp

At first, the thought of hosting your applications in house using a similar method to what the hosting providers use probably sounds a little bit counterproductive. After all, taking this approach to distributing your applications is usually quite a bit more complex and expensive than just installing applications directly onto each user’s workstation. Even so, there are quite a few benefits to using Terminal Service RemoteApp. Many of these benefits are things that you just don’t get if you install the applications locally on each individual workstation or if you outsource your applications to a hosting provider. In my opinion, using Terminal Service RemoteApp gives you the best of both worlds. In the sections below, I will explain some of these benefits.

Seamless Access

Probably the coolest thing about Terminal Service RemoteApp is that application access is completely seamless to the end users. Users do not need to open a Terminal Service session in order to access remotely hosted applications. Instead, Terminal Services RemoteApp provides the illusion to users that the applications are installed locally. Hosted applications can reside alongside applications that are installed locally, and a user would be hard pressed to tell the difference between them.

What this means for you is that you won’t have to spend time training users on how to access hosted applications, because users typically won’t even realize that the applications are hosted. The fact that hosted applications can run alongside locally installed applications means that you can make the transition to application hosting gradually. You don’t have to move all of your applications over to a hosted environment overnight (or at all for that matter).

Centralized Application Management

Just as the primary benefit to using a hosted services provider is ease of management, easier application management is also the main benefit to using Terminal Service RemoteApp.

There was a time when application management was not such a big deal. Applications were installed, and were never touched again until it was time to upgrade to the next version. Today though, almost every application publisher releases application patches on a regular basis. Testing all of these patches and pushing them out to all of your workstations can be a huge task.

Using Terminal Service RemoteApp does not free you from having to keep your applications up to date, but it does make the job a lot easier. Hosted applications are centrally located, so you only have to worry about maintaining a single copy of each application, rather than keeping every single workstation up to date.

Ease of Management for Branch Offices

Terminal Service RemoteApp is ideally suited to organizations that have branch offices, but who do not have a dedicated IT staff in those branches. Using Terminal Services RemoteApp allows administrators to maintain all of the applications from the corporate headquarters, so that the IT staff does not have to make a trip to the branch offices to perform routine application maintenance tasks.

Better Use of Server Resources

Normally, a Windows Terminal Server provides users with a full blown Windows environment. Of course providing each user with a separate instance of an entire operating system consumes a lot of server resources. Hosting applications on a terminal server still requires a considerable amount of server resources, but not as much as if the server were also hosting the Windows operating system.

Coexistence of Otherwise Incompatible Applications

One often overlooked benefit to using Terminal Service RemoteApp is that it allows for the coexistence of otherwise incompatible applications. For example, Microsoft Office is designed so that only one version of Office can be installed at a time. Even so, I know of some corporations that have a business need for running multiple versions of Office. Since hosted applications are not actually installed on workstations, it becomes possible for users to run multiple versions of Microsoft Office, or to run otherwise incompatible applications.

Anywhere Access

My personal favorite benefit to using Terminal Service RemoteApp is that it allows users to access hosted applications from anywhere. With the right components in place, users could conceivably access hosted applications from their laptops while traveling, from their home computers, or even from a Windows Mobile device.

I am in the process of writing a book on telecommuting that will be available sometime in the early summer of 2009, and using Terminal Service RemoteApp to provide access to applications while on the go will be one of the topics that the book covers in depth.

Conclusion

These are just some of the benefits associated with using Terminal Service RemoteApp. In the next article in this series, I will begin showing you how to install and configure this new feature.